Want to turn your Instagram content into a shopping experience your customers can tap, love, and buy from right there in the app?
We’ll show you how to link Shopify to Instagram so you can do just that.
Slapping a “link in bio” in your Instagram captions and crossing your fingers that it’ll drive a few conversions is a thing of the past.
With the powerhouse ecommerce tools available to you today, you can turn your social media content into real sales opportunities.
This guide will walk you through everything you need to connect your Shopify store to Instagram Shopping, step-by-step, with tips, screenshots, and troubleshooting help.
Let’s get to it. Instagram monetization opportunities await!
A Quick Note on Meta’s Commerce Guidelines
Before your Instagram Shopping setup can go live, Meta will review your business to make sure it follows the company’s Commerce Eligibility Requirements.
You’ll want to make sure your business follows these Instagram monetization policy guidelines to the letter, because Meta’s pretty strict about enforcing them.
Here’s what they’re looking for:
- A business in a supported market. Instagram Shopping isn’t available in every country yet. You can check Meta’s list of supported regions here.
- A connected Facebook Page and Instagram Business Account. Both accounts must represent the same business and be fully connected through your Meta Business settings.
- A functional website (your Shopify store) with product listings. Meta requires that the products you tag on Instagram are clearly listed for sale on a dedicated website. Plus, your site must include things like pricing, descriptions, and a clear checkout process.
- Compliance with Meta’s Commerce Policies. These are Meta’s rules around what can and can’t be sold (for example: no adult products, alcohol, or medical devices). Check out Meta’s full policies here.
If your store doesn’t meet one or more of these requirements, your account may not be approved for Instagram Shopping right away.
But don’t worry! Meta will usually tell you what’s missing or needs to be fixed.
Still, the easiest way to get approved quickly is to make sure you follow these guidelines. The more polished, professional, and transparent your Shopify store, the better.
A Step-by-Step Guide to Connecting Shopify and Instagram
There are several key steps you’ll need to follow to make Instagram Shopping work with your Shopify website. The process can be a little daunting, but we’ll walk you through every click of how to set up an Instagram shop.
Keep your eye on the end-game: using shoppable content to turn social media followers into potential customers for your store.
Here’s how to do it, step by step.
1. Change your Instagram from a personal to a business account
You can only unlock the Instagram Shopping feature if your account is set to a business profile, officially called a professional account.
Thankfully, this is super easy to do.
On a desktop or laptop:
- Log in to your Instagram page. Click the Settings wheel in the upper right-hand corner of the screen.
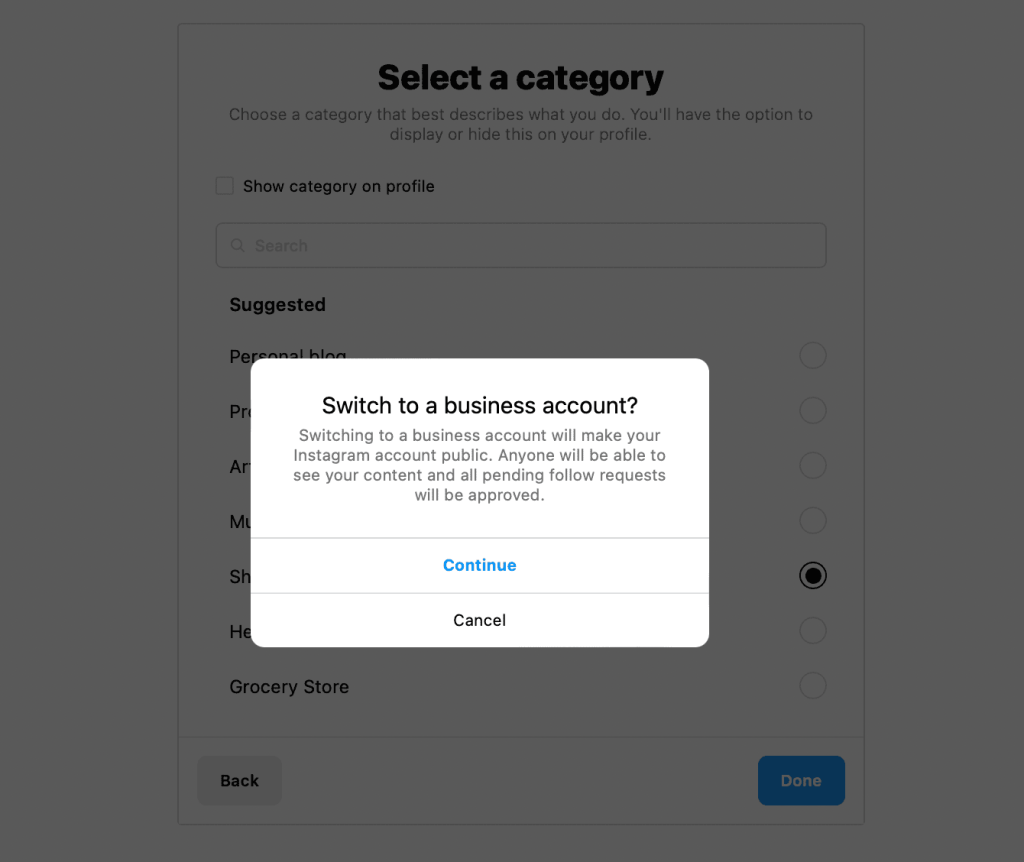
You’ll see an option to “Switch to a professional account.” Click this.
- Instagram will ask you a few questions about your business, including whether you’re a creator (influencer) or a business owner, along with what category your products belong in. Answer these questions.
- After you answer the questions, you’ll get asked one final time if you truly want to switch to a business account. Click “Continue.”
- Congrats! Your Instagram account is ready for business.
On a mobile device:
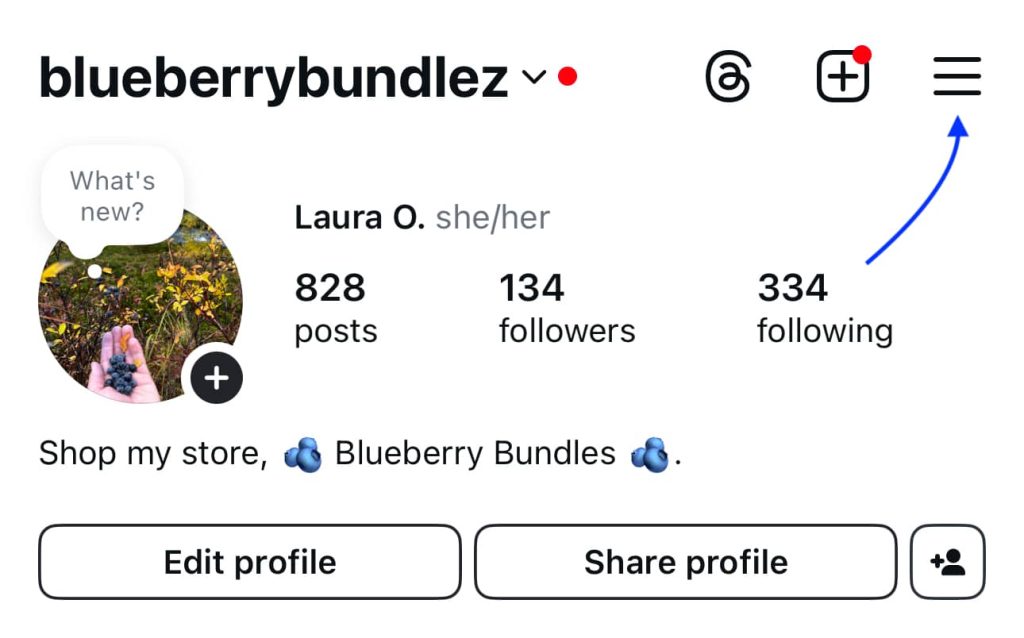
- Click the hamburger menu on the upper right-hand corner of the screen.
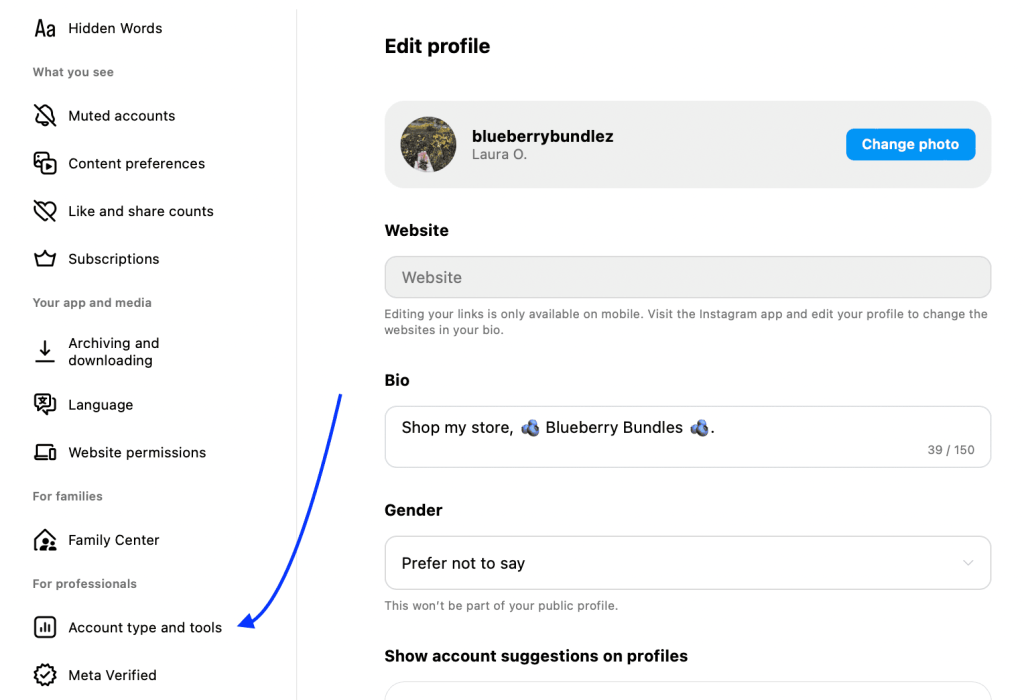
- Scroll down until you see the “For professionals” heading. Click “Account type and tools.”
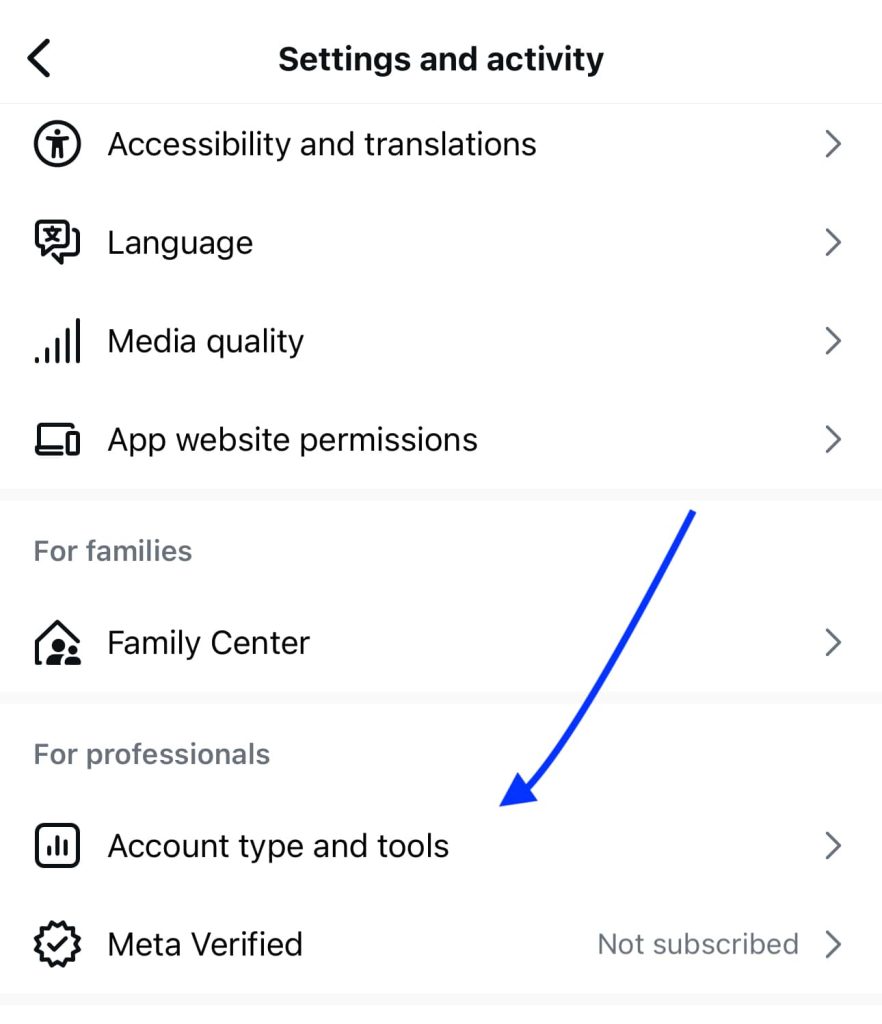
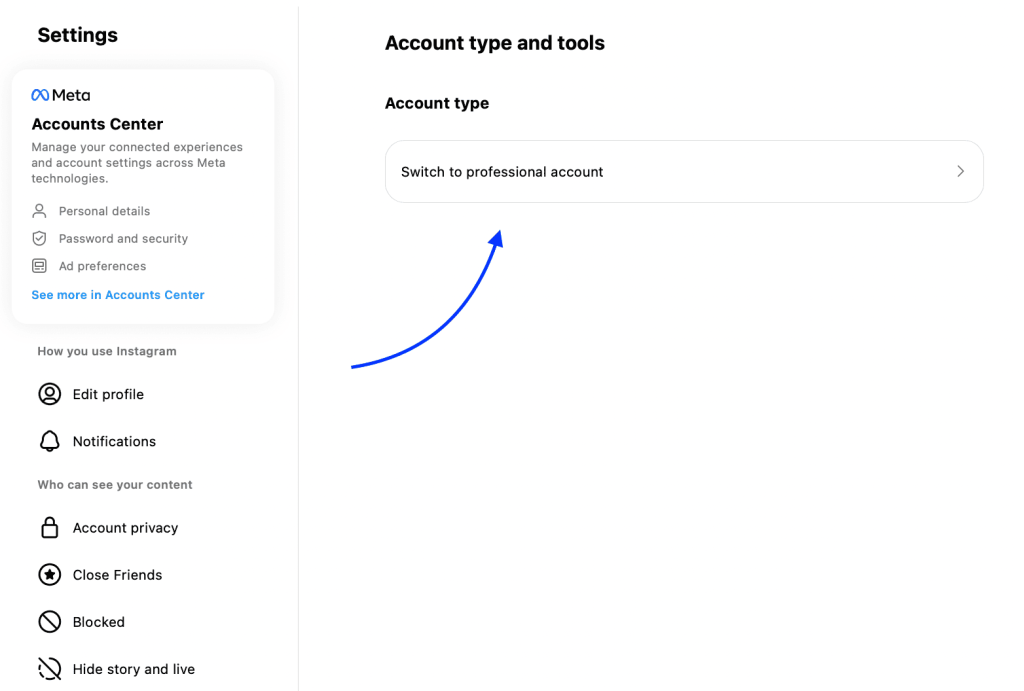
- Answer the questions Instagram asks about what type of account you are. If you sell beauty products, for example, you’d pick “Beauty, cosmetic & personal care.” If you sell clothing, click “Shopping & retail.”
- Once you pick your category, click “Switch to professional account.”
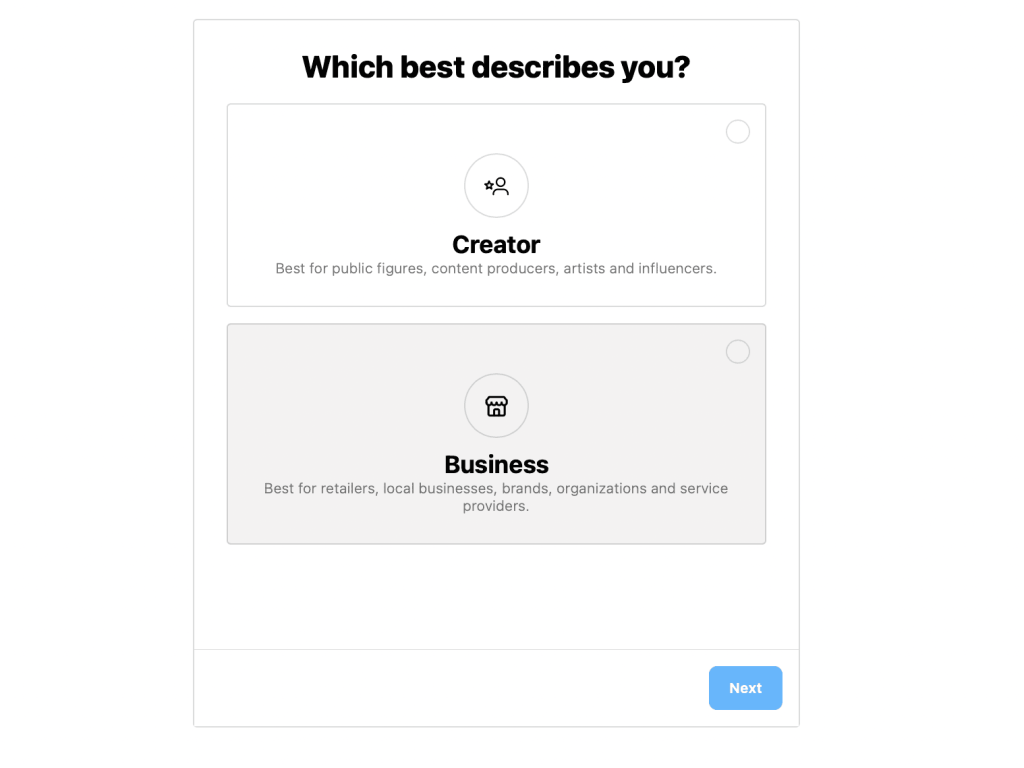
- On the next page, you’ll be prompted to choose whether you want to make a “Business” or “Creator” profile. Choose “Business.”
- Instagram will then prompt you to review and edit your contact information, connect to a Facebook page (which you can skip for now—or go ahead and set up if you prefer), and finish setting up your professional account.
Your Instagram is officially business-ready. Cue the happy dance!
Only good things await.
You now have access to product tagging and analytics, and you’ll be able to officially link your Shopify store to this professional Instagram account.
Need more help? Instagram’s guide to creating a professional account has all the information you need to switch over.
2. Connect Instagram to Facebook Business Manager
If you haven’t already, now is the time to create a Facebook Business Manager account and connect it to Instagram.

You can either:
- Log in with an existing Facebook account
- Log in with an existing Instagram account
- Create a new account
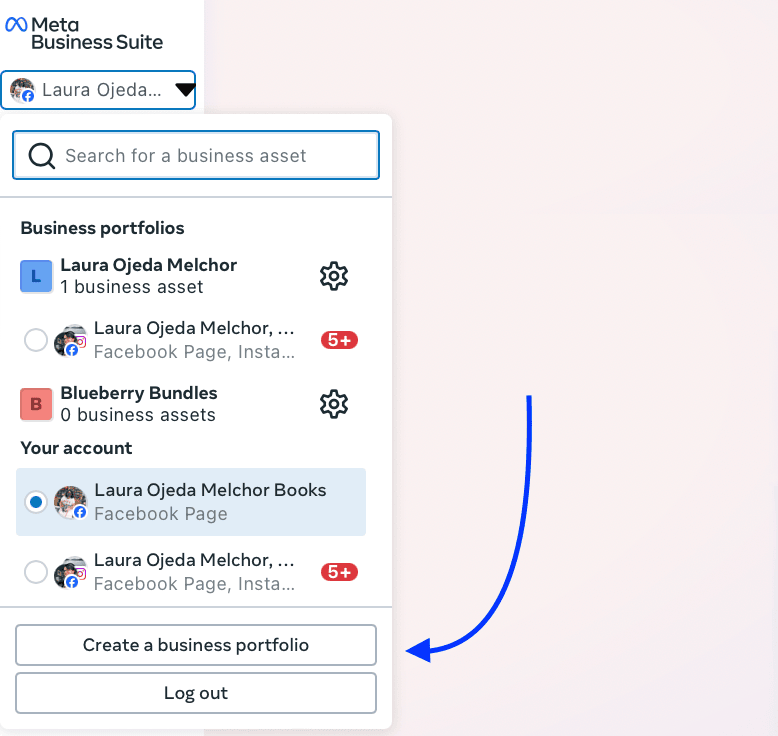
Fun fact: A business portfolio is the new name for what was once a Meta Business Account. Right now you just need to make one for each of your business ventures. For now, we’ll just say you only have one business.
By creating a business portfolio, you’ll connect your business’s Facebook page and professional Instagram account. This allows you to manage everything related to that business from one place.
Go ahead and create a business portfolio if you haven’t already. Give it the same name as your actual business, as seen on your professional Instagram account and Shopify store.

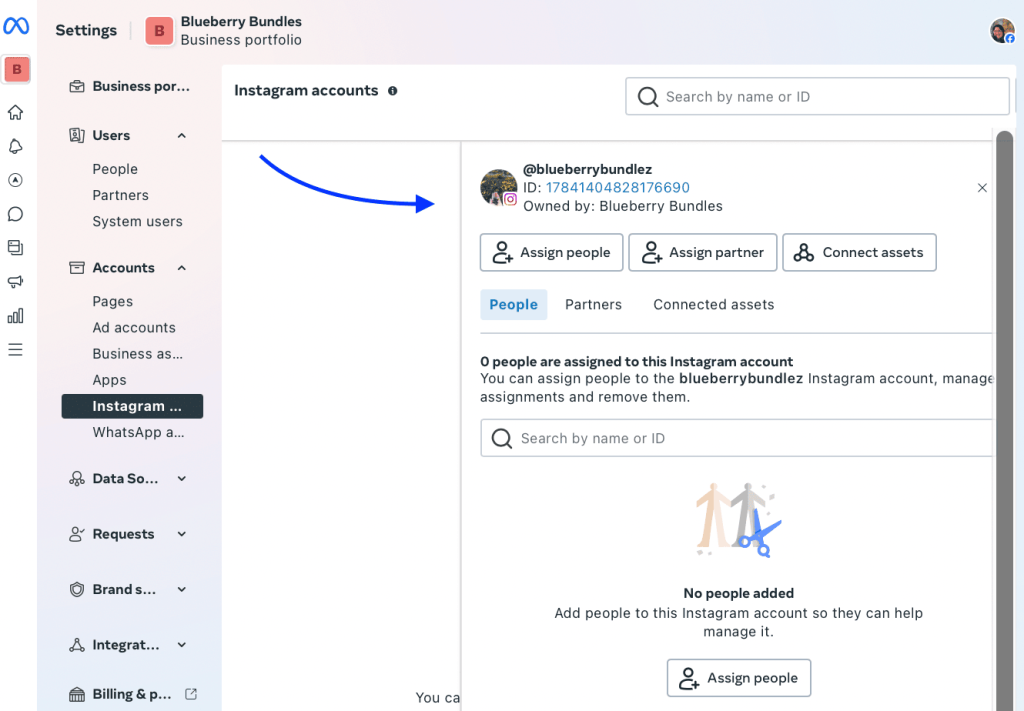
After you create your business portfolio, you’ll be able to click on it anytime from your Facebook Business Manager dashboard.
Access it by clicking the drop-down menu next to your name on the upper left-hand corner of your Facebook Business Manager dashboard. Select the settings wheel next to your portfolio and you’ll go straight to the dashboard for that individual business portfolio.

From the dashboard, scroll down to the “Accounts” section and select “Instagram accounts.”
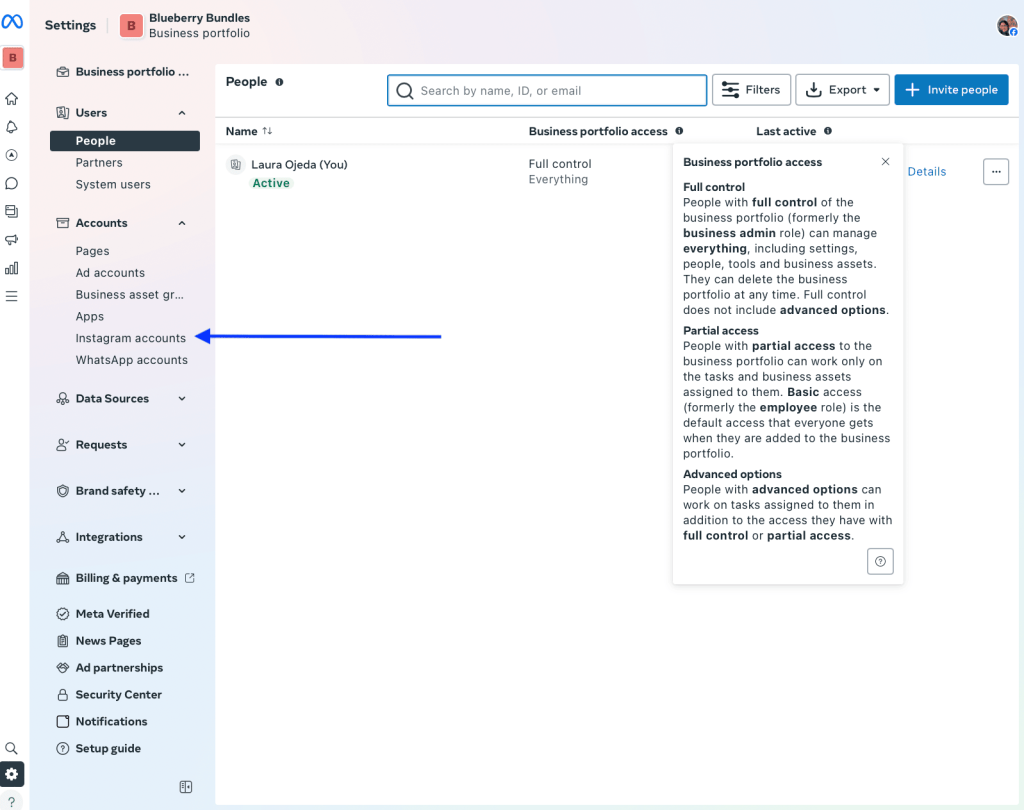
You’ll see a button that prompts you to connect an Instagram account. Click the “+ Add” button, read the terms and agree to them, and then click “Add Instagram account.”
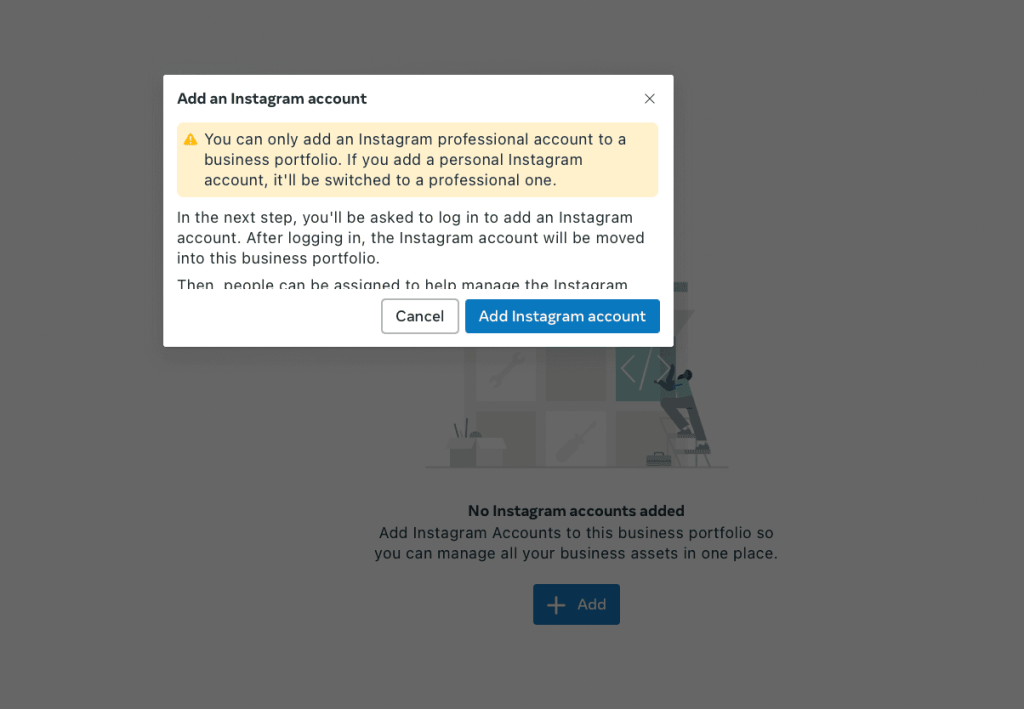
A pop-up window will show up, so make sure your pop-ups aren’t blocked.
In the pop-up window, sign in to your Instagram business account. Once you complete that step, you’ll be taken back to your business profile, where you should see the Instagram account you just connected.
Need extra help? Check out Facebook’s guide to setting up a Business Manager Account.
3. Install the Facebook and Instagram app on Shopify
You’re almost there!
In this step, you’ll install Meta’s Facebook and Instagram app on your Shopify store.
Here’s what to do:
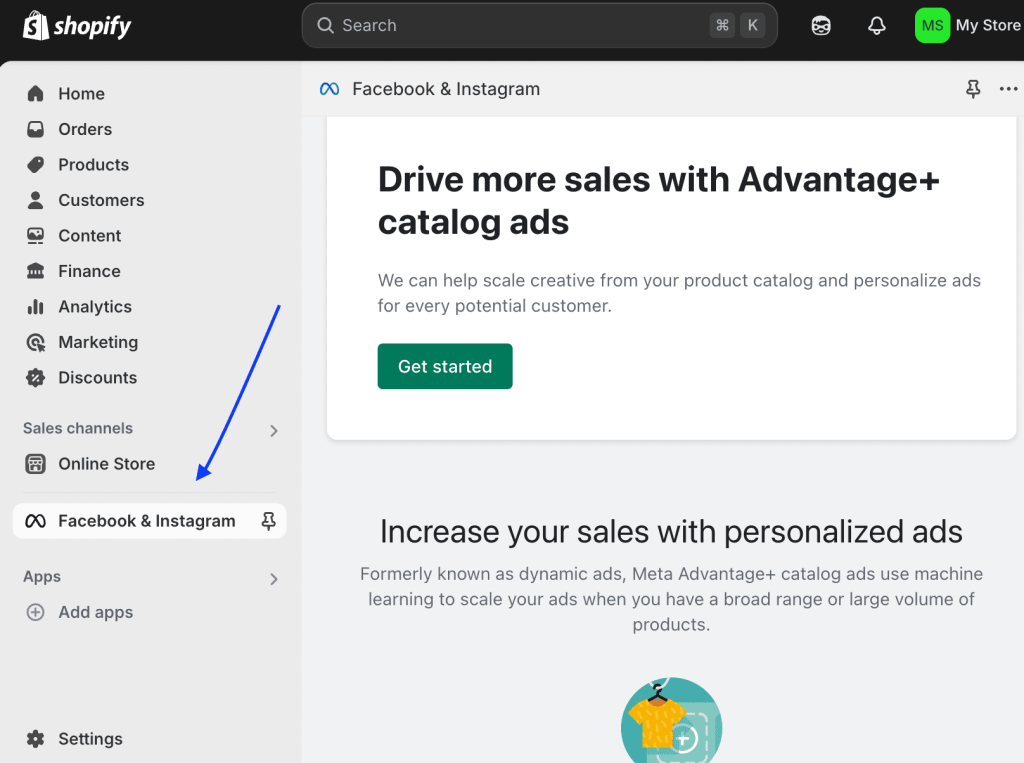
- Log in to your Shopify account. On the navigation menu on the left-hand side of the screen, navigate to the “Apps” section and click the arrow. You’ll see a settings wheel icon with “App and sales channel settings.” Click on it.
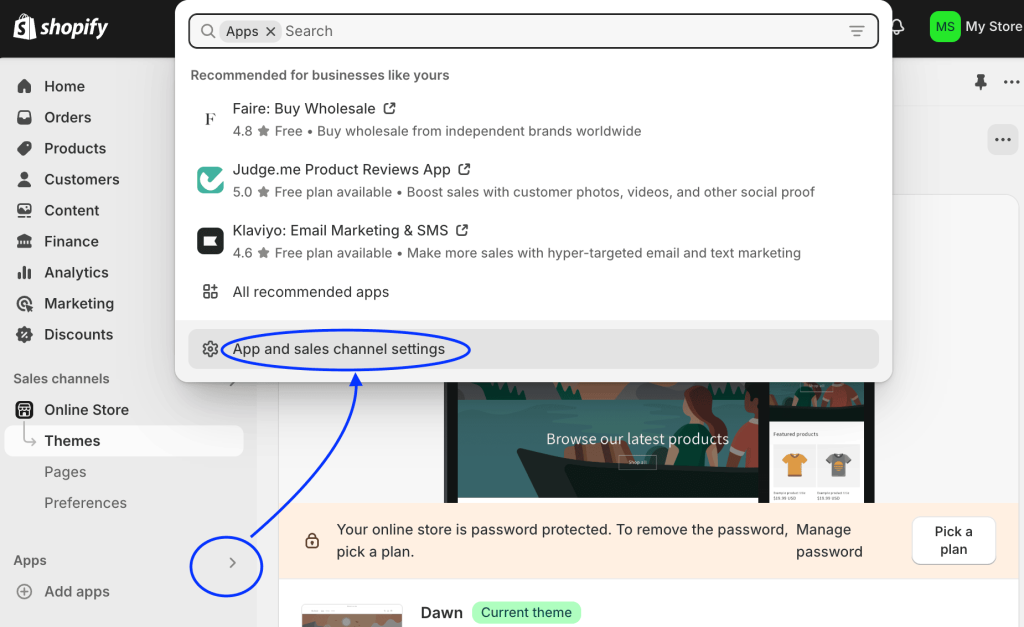
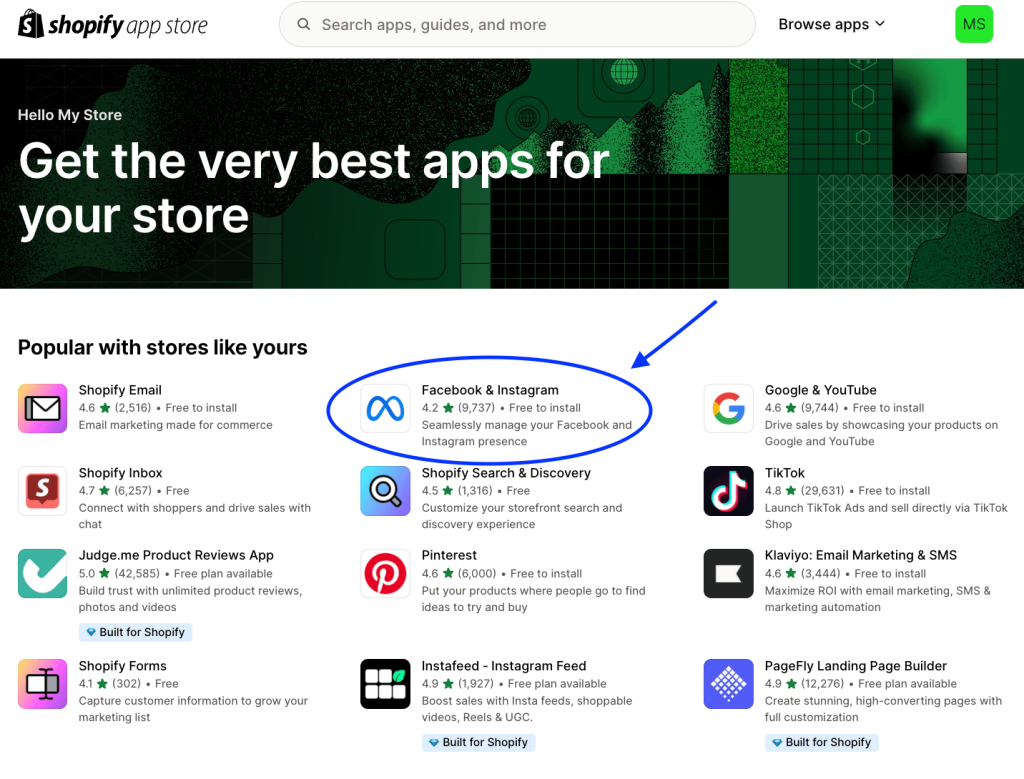
You’ll land on the “Apps and sales channels” page. Click the “Shopify App Store” button.
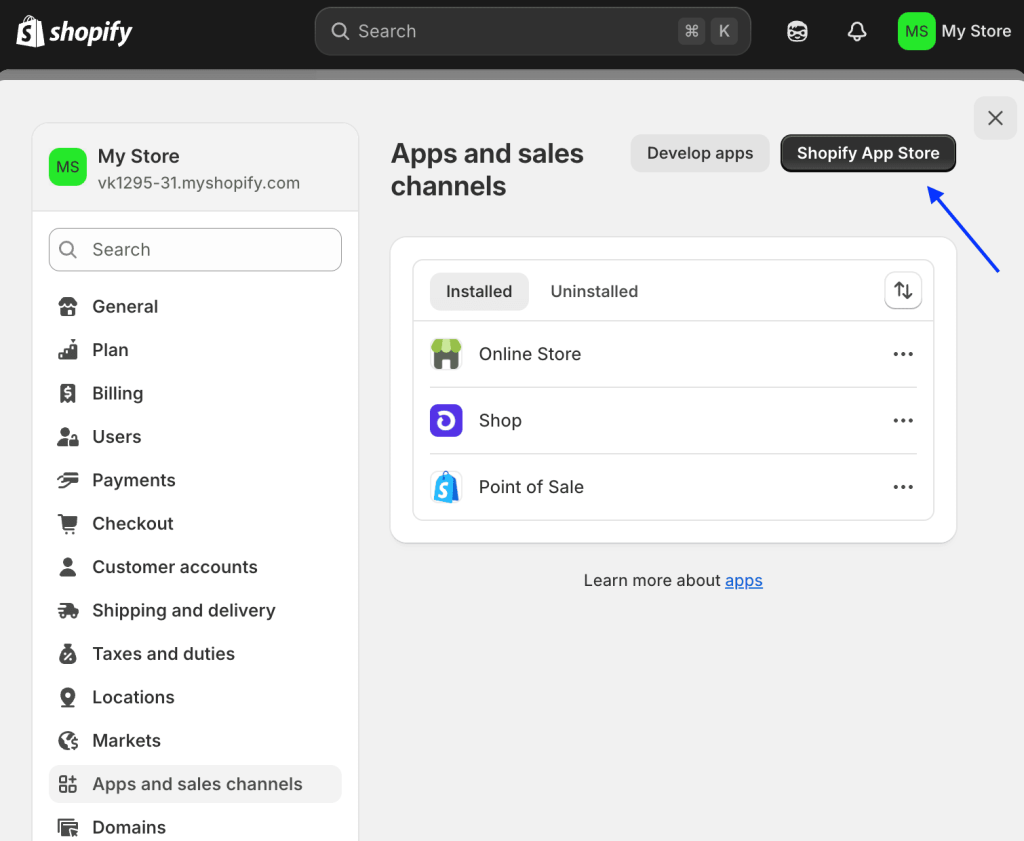
- This button will take you to the Shopify App Store, where you can search for the Facebook and Instagram app. Chances are you won’t even have to—it’ll be right at the top of the page.
- Follow the steps to download this app. It takes just a couple of clicks, and then you’ll be taken back to your Shopify home page, where the Facebook & Instagram app now appears on your navigation menu.
- Scroll down to the “Product comparison” section and select the “Get started” button under the first column, “Shop and ads.” This option lets you have in-app checkout, whereas the other option, “Ads only,” does not. And in-app checkout is what we’re going for here, so make sure to select the right button.
- Follow the instructions to finish setting up your Instagram and Shopify connection! During this process, your Shopify product catalog will be synced to Meta Commerce Manager. This is what powers Instagram Shopping and lets you tag products in posts and reels.
(A quick note: you’ll need to have Shopify Payments set up to complete the Instagram and Shopify connection. If you’ve been selling on Shopify already, you should be good to go. If not, here’s how to activate Shopify Payments.)
4. Enable Instagram Shopping
Once your catalog is synced and your Facebook and Instagram accounts are connected through Meta Business Suite, it’s time to apply for Instagram Shopping.
Here’s how to do it:
- Open the Instagram app and go to your Instagram Business Profile.
- Tap the hamburger menu in the top right corner.
- Click Settings and privacy → Business → Set up Instagram Shopping.
- Follow the prompts to submit your account for Meta to review.
Instagram will review your account to make sure it meets Meta’s Commerce Eligibility Requirements.
We know it’s tough because you’re so close, but hang tight. This review process can take a few hours or even a few days.
5. Verify Your Connection (and Your Product Catalog)
Once Meta approves your account for Instagram Shopping, it’s time to make sure everything is connected and ready to go.
Start by checking your Instagram settings:
- Open the Instagram app and go to your Instagram Business Profile.
- Tap the hamburger menu in the top right corner.
- Click Settings and privacy → Business → Shopping.
- You should see your connected product catalog listed here.
If the catalog appears, you’re ready to start tagging products in your posts, stories, and reels!
To double-check the accuracy of your product catalog, follow these steps:
- Head to Meta Commerce Manager.
- Select your business and click into your catalog.
- Make sure your items are showing up with current images, prices, and product descriptions optimized for SEO.
Once your product catalog is synced, it powers Instagram Shopping and your Facebook Shop, giving you a wider surface to reach shoppers across Meta.
Now you can drive more conversions with content right from your Facebook and Instagram feeds, stories, and reels.
Hooray! 🎉
Common Issues and Fixes
If your setup isn’t going smoothly, you’re not alone. Here are a few common issues we’ve seen and how to fix them fast.
Catalog not syncing?
- Double-check that your products are marked as available on the Facebook & Instagram sales channel in your Shopify website admin.
- Visit Meta Commerce Manager and make sure the correct catalog is selected and linked to your Instagram account.
- If products are still missing, try re-syncing from your Shopify settings or disconnecting and reconnecting the app.
Instagram account not eligible?
- Make sure your Instagram is set to a business (professional) account and connected to a valid Facebook Page.
- Your Shopify store must meet Meta’s Commerce Eligibility Requirements, including having a complete product catalog and a fully functioning checkout experience.
- If you’ve just applied, give Meta a few days to complete the review. Sometimes it takes a little time.
Facebook Channel in Shopify not working?
- Check that your Facebook Business Manager account is verified and your Facebook Page is published.
- Go to Shopify Admin → Settings → Apps and sales channels → Facebook & Instagram, and click “Reconnect” or “Manage” to troubleshoot.
- You may need to clear your browser cache or log in to Meta again to confirm permissions.
Tip: If all else fails, remove the Facebook & Instagram sales channel and reinstall it. Just make sure to reconnect your accounts carefully during setup.
Final Checklist: Is Your Instagram Shopping Setup Ready?
Use this quick checklist to make sure everything’s in place before you start tagging products and making your Instagram feed shoppable.
Setup Essentials
- Instagram account is set to a Business (Professional) profile
- Facebook Page and Instagram account are connected in Meta Business Manager
- Facebook & Instagram sales channel is installed and active in your Shopify admin
- Shopify Payments is set up (for in-app checkout, if required)
Product Catalog
- Product catalog is synced and visible in Meta Commerce Manager
- Products include images, pricing, and are marked “available”
Instagram Shopping
- Instagram Shopping is enabled and approved in the app
- You see your catalog listed under Settings → Business → Shopping
- You can tag products in posts, reels, and stories
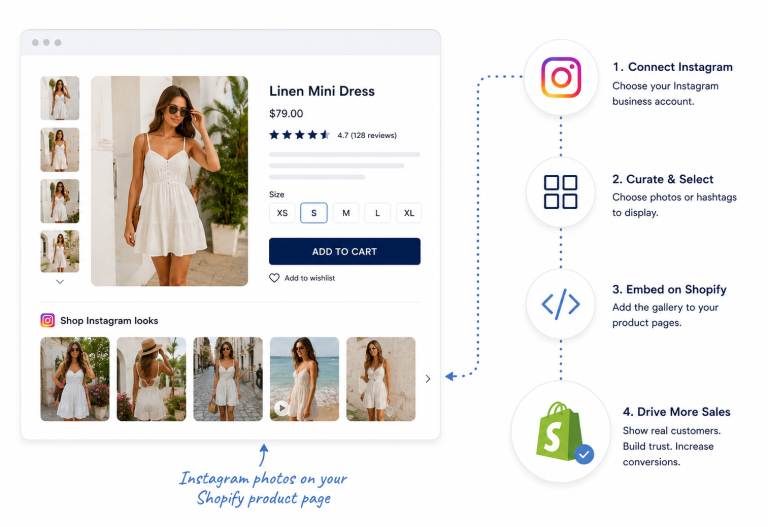
Pro Tip: Boost Instagram Shopping with Foursixty
Instagram Shopping is just the start. Foursixty helps Shopify brands turn posts into sales with features like:
- Shoppable Instagram galleries: Embed fully customizable Instagram galleries into any page of your site
- Shop Minis: Create customized, shoppable UCG or brand-content galleries on the Shop app
- UGC (user-generated content) integration: Unlock the power of social proof by showcasing user-generated videos and images on your website
With Foursixty, you can easily enhance your user generated content strategy by adding shoppable galleries and UCG to product pages, emails, and landing pages.
Try Foursixty for free and join top brands in turning likes into a solid UCG strategy that drives sales.
Updated Resources
Need a deeper dive or official documentation to help you through the process? These resources are regularly updated and can help if anything changes in the Shopify or Meta setup journey.
- Shopify Help Center: Instagram Shopping
- Meta Business Help Center
- Instagram Shopping Setup Guide (Meta for Business)
FAQs
How do I link my Shopify account to Instagram?
To link your Shopify account to Instagram, you’ll need to:
- Install the Facebook & Instagram sales channel app from the Shopify App Store
- Connect your Facebook Business Page
- Make sure your Instagram account is set to a business (professional) profile
Once you connect Shopify and Instagram, your product catalog will automatically sync to Meta’s Commerce Manager. This will let you create shoppable posts and Instagram stories, meaning you can tag products directly in your content.
Hello, engagement and conversions!
How do I promote my Shopify product on Instagram?
The most effective way to do this is to create shoppable posts or Instagram stories that tag your products. This lets your users shop directly from the social media content on an app they probably already spend hours scrolling.
Just make sure each product has a detailed product description, great visuals, and a link back to its full product page on your Shopify website.
You can also increase the reach of your product with hashtags, by collaborating with creators, or by running targeted ad campaigns using the Facebook Pixel for advanced tracking.
How do I set up a Facebook shop with Shopify?
To set up a Facebook Shop with Shopify, follow these steps:
- Go to your Shopify admin,
- Add the Facebook sales channel
- Connect your Facebook Business Page through Meta Business Suite
Once your product catalog is synced—and as long as your business meets Meta’s commerce eligibility rules—your products will automatically appear in your Facebook Shop.
From there, you can promote your products across both Instagram and Facebook.
How to monetize Instagram reels?
There are several ways to make money from your Instagram Reels, whether you’re a brick-and-mortar or e-commerce brand (or a mixture of both). The two most impactful ways are to set up your Instagram business account and use Reels to showcase what you sell. With a professional account, you can link directly to your shop or website.
You can also turn your Reels (or user Reels that feature your products) into shoppable content by embedding them in your Shopify store with tools like Foursixty. Making money with UCG is easier than you might think!
What is Affiliate vs. Sponsored content on Instagram?
From a brand perspective, affiliate content means you only pay creators when they drive sales through tracked links or codes.
You can also have affiliate tools and apps that will allow you to convert instagram traffic into sales (if you’re running an eCommerce store like Shopify or Magento).
Sponsored content means either paying a creator to post about your product or running your own paid ads (like boosted posts or Instagram Ads) to reach a wider audience.
What is Business vs. Creator account on Instagram?
A Business account is meant for brands, companies, and retailers. It offers tools like Instagram Shopping, ads, and advanced analytics to help drive sales.
A Creator account is built for influencers, content creators, and public figures. It offers similar tools, but the focus is more on audience insights and flexible message filtering to manage fan engagement.